Hello There! We have been receiving a lot of questions as to how to go about ordering a custom bobblehead or figurine as well as when to submit their photos. So for those not as computer savvy it's no problem, we're going to show you step by step how to order through our visual tutorial. Hope this helps!
Note: You can click on an image to enlarge.
1. The Ordering Page
Once you've found a bobblehead or figurine that catches your attention, you'll come to the ordering page. Here you choose the type you would like (as shown, add accessory or add a logo or clothing text), choose hair and eye color and more.

2. The Shopping Cart
Once you click add to cart, you will be directed to your shopping cart. Here you can make changes to an order and view your estimated total.

3. Multi-Page Checkout
After clicking the checkout button, your directed to the checkout page. You have three options:
*Place an order without creating an account
*Sign up and create an account
*Or, use an existing account

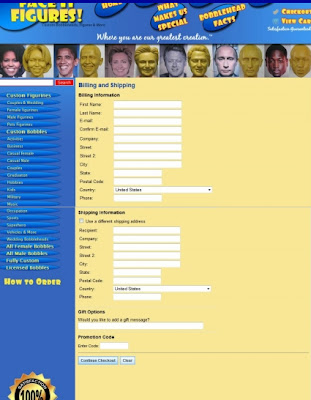
4. Billing & Shipping Page
After you click on continue checkout, it's then time to add your billing and shipping address. Fill the form out in it's entirety and check for errors before proceeding. If sending it elsewhere, don't forget to add it as a different shipping address. Enter a promo code if you have one.
5. Payment Method Page
Continue checkout and choose your payment method. You have three options:
*Credit or Debit card
*Send a check or money order
*Or, choose Paypal if you have an account

6. Invoice Page
Here you will find order details including address and payment method used. You may also add a promo code if you have one. Double check for errors before proceeding. Once you checked, choose your shipping method then click confirm order.

7. Confirmation Page with Photo Submission Form
The last step is to fill out the photo submission form which will be on the order confirmation page. Fill it out in it's entirety. You will be able to upload six images and if you need to send more, you can send them via email attachment or through our customer service form. Don't forget to add any special instructions if you have them.

Adding Photos
When you click on a browse button on the form, a file upload window will pop up. Depending on where you store your images, this would be the folder you would double click to access your photos. Usually photos are stored in the Pictures folder.

2. Click on the first image you would like to upload. (You only have to click once). You'll see the image file name appear in the box below. Then click the open button.

3. That's it! Once you click the open button, the window will close and the image will be added to the form. Repeat these steps for each photo submitted. Once, your finished hit the submit form button we'll take it from there!
If you would like to know how to upload pictures from your digital camera onto your computer, keep reading!
How to Upload Pictures From A Digital Camera

No comments:
Post a Comment